So, to build an AR, you need to start with the basics. There are two basic parts of an AR - the lower, and the upper. This discussion addresses the lower.
The lower (sometimes called a "stripped lower") consists of the piece that houses the trigger group, the magazine well, the bolt catch and the buffer tube. In it's "stripped" state it looks like this:
Anna chose the polymer lower manufactured by New Frontier Armory. It's a little lighter than a standard aluminum lower.
Out of the box, it looks just like the aluminum version. More on that later.
Next step. Take inventory of the lower parts. You should have 33 parts, including the stock, buffer tube, buffer spring and insert, springs, pins, detents, trigger group, safety and catches.
Here are the lower parts laid out on the table.
Each group will be addressed individually.
Anna chose to install the trigger group first. Here are the parts of the trigger group.
From top and clockwise, you have the trigger spring, the hammer spring, the trigger, the disconnect, and the hammer. There are two pins that hold the group in the lower and an additional spring to operate the disconnect.
Here is Anna installing the trigger.
The disconnect sits on top of the trigger and both get pinned through the lower. See the little circle directly above the trigger.
Next is installation of the hammer.
After the installation of the trigger and hammer, Anna installed the safety. A relative easy install: cock the hammer to lower the disconnect and push the safety through (from the left side).
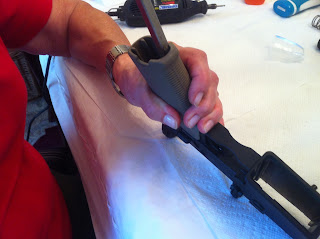
Next, the magazine catch. This proved to be a bit of a problem because the formed slots were smaller than the metal catch part. It required some modification to the lower to make the part fit. Initially, Anna tried to enlarge the dimensions of the slot with an electric nail file.
This was replaced with a Dremel, which removed enough material to allow the catch to function properly in the lower. Unfortunately, this added at least 15 minutes to the build time.
When the grinding was done, this is what the part looked like.
As can be seen in this picture, the bolt catch is also installed. This, too, is relatively easy to do but requires some patience when setting the roll pin. Sorry that we didn't capture it in pictures. It's a tight fit and cramped quarters. Take your time and tape the side of the lower (especially if it's aluminum) to prevent marring from the punch and hammer.
Next, Anna installed the grip. It's actually very easy and involves one screw to hold it to the lower. When attaching the grip, you need to install the safety detent and spring. The detent can be placed into the hole in the lower; position the spring in the hole in the grip. By slowly pushing the grip into place, the spring depresses the detent back up into the hole. It's a little tricky getting the grip screw in place because it's up inside the grip but you can use gravity to your advantage or a long nose plyers. Here Anna has successfully mated up the spring and detent and is tightening the grip screw.
Following the grip, the buffer tube, spring and stop were installed. This includes installing the buffer retention pin, and the rear latch pin detent and spring for the upper. Here you see the buffer tube installed, the rear latch pin is installed, the buffer retention pin is installed and she is preparing to insert the spring and buffer. Note: the hammer is in the uncocked position. Push it down to the cocked position prior to inserting the buffer and spring.
The entire build took about an hour. Minus the extra 15 minutes adjusting the magazine catch slot, the project actually took about 45 minutes. Not bad for the first time (although she did get some coaching from somebody who has built out a lower. And there are a number of really good tutorials on the web. Here is one of them.
Bottom line. Even if you don't know anything about guns. Even though you may not be mechanically inclined, this project may seem daunting, but in fact is relatively easy. Before you start, familiarize yourself with the parts and where they go in the lower. Pay attention to the way the springs are installed (it matters). And be patient. Some of these parts are very small. When you shoot the detent out of the hole and you hear it land someplace in the room, be prepared to spend some time finding it.


.JPG)
.JPG)
.JPG)
.JPG)


No comments:
Post a Comment